Android Tutorial – Overview and contents
Because it is a very efficient and attractive platform:
- open source platform based on Linux;
- portable across a wide range of mobile platforms;
- optimized for low-power and low-memory devices;
- supports Java applications based on the Dalvik virtual machine;
- has multimedia support for 2D vector graphics, OpenGL, MP3, AVC and AAC;
- increased application security;
- component-based architecture for applications;
- data storage solution based on SQLite;
Android has become one of the major mobile platforms along Windows Mobile, Symbian, iPhone and J2ME (Java Mobile Edition)
In order to learn and develop Android applications you need to (for Windows) :
- download and install the Java Development Kit (JDK); the latest is 7 but any version starting with JDK 6.0 is recommended; you can download the JDK from java.oracle.com; DO NOT install the JRE (Java Runtime Environment) because Eclipse and the Android SDK need the tools from the JDK (Java Development Kit); even if you have a 64bit system it is recommended to install the 32bit version because there are still some compatibility problems regarding the JDK, the Eclipse IDE and the Android SDK;
- install the Eclipse IDE; using an IDE is not required but it is recommended as it is going to save you a lot of time and it will let you concentrate on the solution rather than on how to compile, build and execute it; Eclipse is available at http://www.eclipse.org/ and you should download the Eclipse IDE for Java Developers or the Eclipse Classic version; same as the JDK install the 32bit version;
- download and install the Android SDK Starter Package; the are two distributions for the Starter Package, both available at developer.android.com/sdk/index.html; if you have Windows and you chose the installer, which is the recommended version, on Windows 7 you can get an error (bug) because the installer does not detect the Java JDK; the solution (in some cases) is to hit Back and after that Next to return to the JDK detection step; install the Android SDK to a permanent directory such as C:\Android;
- using the Android SDK Manager (installed at the previous step) download the Android SDK Components which include SDK Tools, documentation, platforms, libraries, USB Driver for Windows and samples; at the SDK Manager start it will check available downloads and updates but you can manage what components to download from the Available packages panel;
 Using Android SDK Manager to download the Android SDK Components
 Using Android SDK Manager to download the Android SDK Components
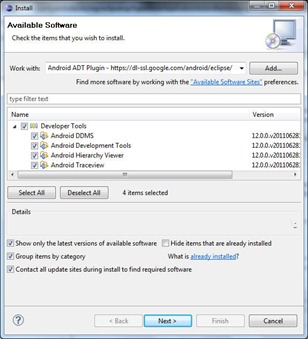
 - install the ADT (Android Development Toolkit) Plugin for Eclipse:
- in Eclipse menu select Help > Install New Software…;
- click Add button, in the top-right corner;
- in the Add Repository form, enter “Android ADT Plugin” (or whatever name you like) for the Name and the following URL for the Location:
- click OK (If you have trouble acquiring the plugin, try using “http” in the Location URL, instead of “https“)
- in the Available Software dialog, select the checkbox next to Developer Tools and clickNext;
- in the next window (install details and items review) click Next;
- read and accept the license agreements (check the radio button) and click Finish;
- restart Eclipse;
- configure the Eclipse ADT plugin:
- in Eclipse menu select Window > Preferences…to open the Preferencespanel;
 Configure the Eclipse ADT plugin
 - in the Preferences window select Android category from the left panel;
- in the main panel, click Browse… and locate the Android SDK directory (in this tutorial, the Android SDK was installed at step 3 in C:\Android);
- click Apply, then OK.
- in Eclipse menu select Window > Preferences…to open the Preferencespanel;
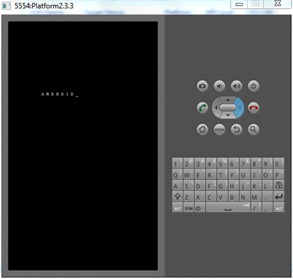
- test the Android SDK and the Android Platform by running the emulator; to do this you must create an Android Virtual Device (AVD)using the Android SDK and AVD Manager:
- open the Android SDK and AVD Manager from Start > Programs > Android SDK Toolsor from Eclipse using the Window > Android SDK and AVD Manager menu option;
- from the left panel, select the Virtual devices category;
- in the main panel click the New… button;
 Create an Android Virtual Device (AVD)
 - in the Create new Android Virtual Device window set the name of the virtual emulator (A), the Android Platform (B), the size of the memory card (C), the emulator skin (D) and other hardware settings (E);
- select the newly created virtual device and start the emulator using the Start… button;


No comments:
Post a Comment