Tuesday, May 8, 2012

How to Use Google Maps in Android Application


How to Use Google Maps in Android Application


This tutorial demonstrates how to display Google Maps in an Android application.
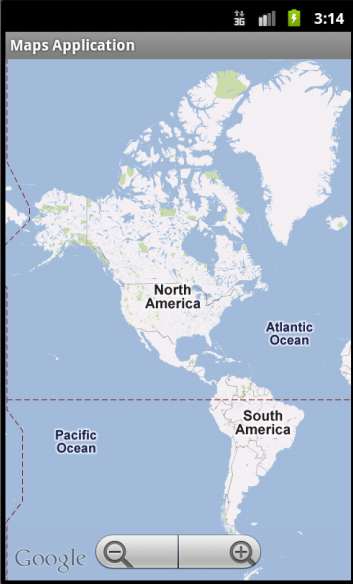
Download Google APIs

To use Google Maps in your application, you need to download specific Google APIs. If you already downloaded the Google APIs then skip this step otherwise follow these instructions to download the updated Google APIs of your desired version.
Start SDK Manager from the Android SDK folder on your computer. Click on the Available Packages.
Click and expand third party Add-ons folder. You will see Google Inc folder. Expand this folder and select the desired version of APIs you want to install.
Click on the "Install Selected" button at the bottom, to install the APIs.
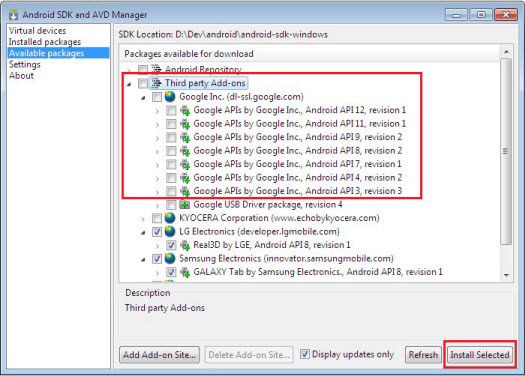
Android SDK Manager

Create Virtual Device

Next you need to create a specific virtual device that uses the Google API of your desired version. To create the virtual device, click on the "Virtual Devices" option in the left menu.
Click on the New button to create a new virtual device. Enter appropriate name for your virtual device. Select the desired version of Google API from "Target" drop down. Input some value in Size text box and click the "Create AVD" button to create the virtual device.
Upon successful creation select the newly created device and click the "Start" button to start the virtual device.
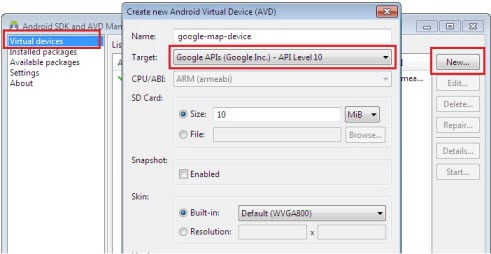
Get Google Map API Key

The next step is to get the Google Map Api Key. To get the key visit Google code project athttp://code.google.com/android/add-ons/google-apis/maps-api-signup.html . At the bottom of the page you will find a text box to input MD5 fingerprint.
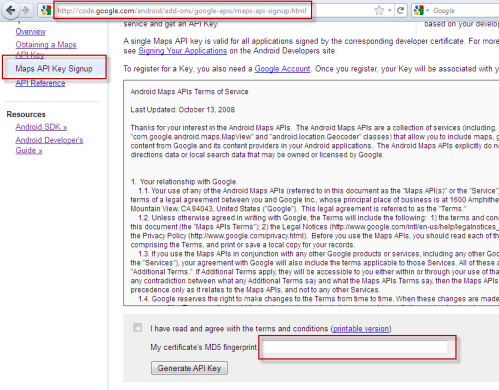
You can get your certificate's MD5 fingerprint from your local machine. To create MD5 fingerprint you need to run "Keytool"  utility that comes with the JRE.
As you are working in development environment, first you need to find the location of debug certificate. In Eclipse, click Window -> Preferences -> Android -> Build.  You can see default debug keystore. Copy it to clipboard.
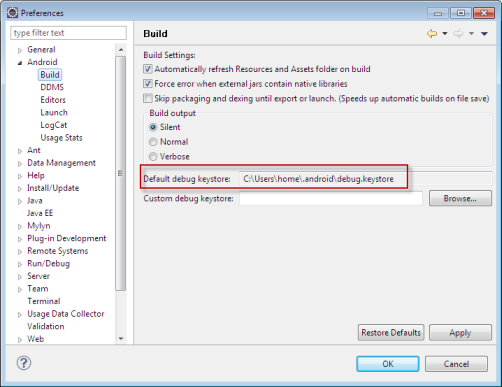
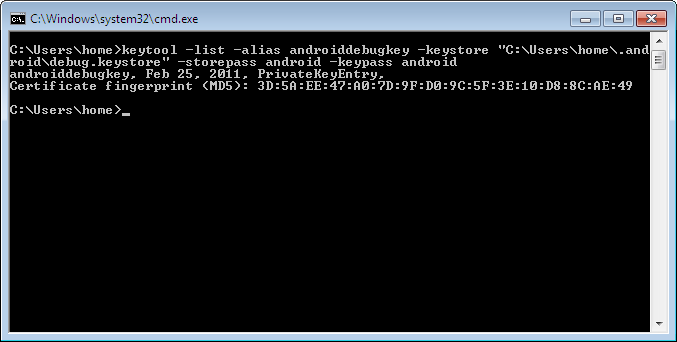
Now open the command window and type following command at command prompt.
keytool -list - alias androiddebugkey -keystore "Path to keystore debugkey" -storepass android -keypass android
Replace the string "Path to keystore debugkey" in above line with your computer's path of keystore debugkey. Now press enter and keytool utility will create the fingerprint and display it on the screen - copy this finger print.
Go back to the Google code project web page (you opened in the above steps) paste or type your MD5 finger print in the text area  for "My certificate's MD5 fingerprint:". Press "Generate API key" button.
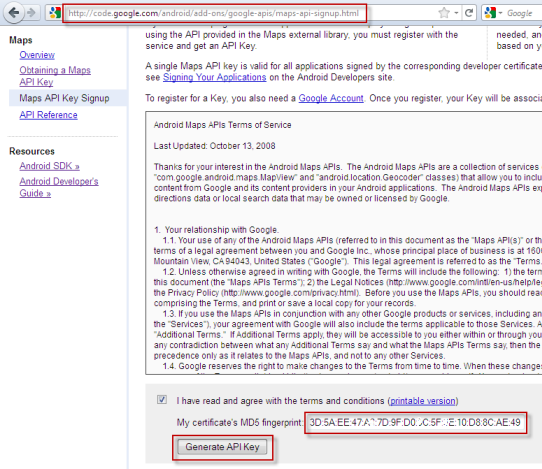
It will generate the API key and bring you to the next page. You need to sign in with your Google account.
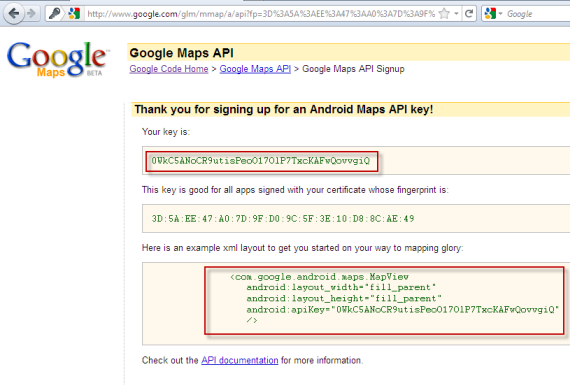
 
In the above image you can see the generated key and the sample code for your android application's layout xml file. Copy the sample code for your generated key so that you can use it in your application.

Android Application

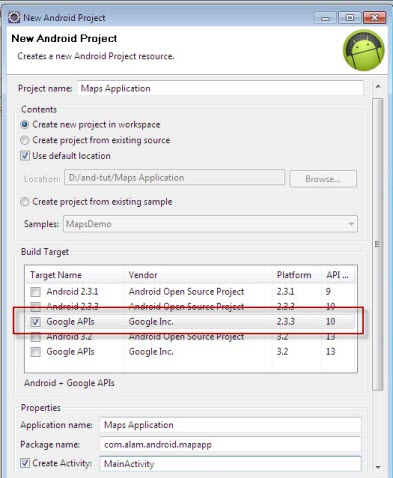
Now open the Eclipse and create a new Android project. This time for "Buid Target", select the "Google APIs" of your desired version. Fill rest of the fields and create the project.
Open the main.xml layout file of your project and make changes according to the code given below. Remember to replace API Key with the key you generated using MD5 fingerprint from your computer.  Assign a unique id to your map view, as you will access it from the application code. If you want your map to be interactive and clickable then set its clickable property to true.
The final xml layout file should be looking similar to the following code.
<?xml version="1.0" encoding="utf-8"?>
<LinearLayout xmlns:android="http://schemas.android.com/apk/res/android"
    android:orientation="vertical"
    android:layout_width="fill_parent"
    android:layout_height="fill_parent"
    >
<com.google.android.maps.MapView
android:layout_width="fill_parent"
android:layout_height="fill_parent"
android:id="@+id/my_map"
android:clickable="true"
android:apiKey="0WkC5ANoCR9utisPeoO17OlP7TxcKAFwQovvgiQ"
/>
</LinearLayout>
Now open AndroidManifest.xml file. You need to add internet permissions to your application, as your application will use internet to access the map. Add following line of code to your manifest file.
<uses-permission android:name="android.permission.INTERNET"></uses-permission>
You also need to include the Google API. Add following line under the application tag.
<uses-library android:name= "com.google.android.maps" />
Here is the sample code of updated manifest file.
<?xml version="1.0" encoding="utf-8"?>
<manifest xmlns:android="http://schemas.android.com/apk/res/android"
      package="com.alam.android.mapapp"
      android:versionCode="1"
      android:versionName="1.0">
    <uses-sdk android:minSdkVersion="10" />
   
   <uses-permission android:name="android.permission.INTERNET"></uses-permission>
   
    <application android:icon="@drawable/icon" android:label="@string/app_name">
   
  <uses-library android:name= "com.google.android.maps" />
   
        <activity android:name=".MainActivity"
                  android:label="@string/app_name">
            <intent-filter>
                <action android:name="android.intent.action.MAIN" />
                <category android:name="android.intent.category.LAUNCHER" />
            </intent-filter>
        </activity>

    </application>
</manifest>

Now open the MainActivity.java and extend it from the MapActivity, instead of Activity class.
public class MainActivity extends MapActivity
If you get any errors, import the MapView and add the un-implemented methods. At this point your application is ready to run and display a map in the emulator.
If you want to add a built-in zoom control to your map then go ahead and follow these instructions.
In the onCreate method, get a reference to MapView that is defined in the xml layout file.
MapView mView = (MapView) findViewById(R.id.my_map);
Set the built-in zoom control by calling
mView.setBuiltInZoomControls(true);
Final code for MainActivity.java
public class MainActivity extends MapActivity {
    /** Called when the activity is first created. */
    @Override
    public void onCreate(Bundle savedInstanceState) {
        super.onCreate(savedInstanceState);
        setContentView(R.layout.main);
      
        // Get a reference to MapView
        MapView mView = (MapView) findViewById(R.id.my_map);
        // Set the built-in zoom control
        mView.setBuiltInZoomControls(true);
    }

 @Override
 protected boolean isRouteDisplayed() {
  // TODO Auto-generated method stub
  return false;
 }

}

How to display route between two points (geopoints) on Google Maps in Android


How to display route between two points (geopoints) on Google Maps in Android


Recently a have some task in my Android project.
I needed to show route (directions) between two points (geopoins)on google maps in Android.
I thought it can be simple task. But It was a lot of interesting things :).
I’ve discovered a lot of topics of this problem.
I find one usefull. This is IT
But, it didn’t works for me.
Here I want to show my changes of this project.

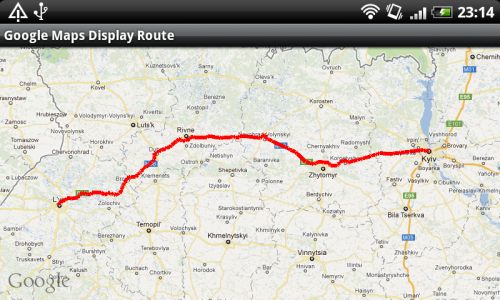
Android Google Maps. How to show route between two geopoints on map.


RoadProvider.java
------------------
import java.io.InputStream; import javax.xml.parsers.DocumentBuilderFactory; import javax.xml.xpath.XPath; import javax.xml.xpath.XPathExpression; import javax.xml.xpath.XPathFactory; import org.w3c.dom.Document; public class RoadProvider { private static Document xmlDocument; public static Road getRoute(InputStream is) { Road mRoad = new Road(); String expression = "string(//Placemark/GeometryCollection/LineString/coordinates)"; String expression2 = "string(//Placemark[contains(name, 'Route')]/description)"; try { xmlDocument = DocumentBuilderFactory.newInstance().newDocumentBuilder().parse(is); XPathFactory xPathFactory = XPathFactory.newInstance(); XPath xPath = xPathFactory.newXPath(); XPathExpression xPathExpression = xPath.compile(expression); String result = xPathExpression.evaluate(xmlDocument); String[] arr1 = result.split(" "); for (String str : arr1) { String[] coords = str.split(","); if (coords.length == 3) { double[] xy = new double[] {}; double x = Double.parseDouble(coords[0]); double y = Double.parseDouble(coords[1]); xy = addDouble(xy, x); xy = addDouble(xy, y); mRoad.mRoute = addDouble(mRoad.mRoute, xy); System.out.println("PARSING ..... "); } } xPathExpression = xPath.compile(expression2); String description = xPathExpression.evaluate(xmlDocument); mRoad.mDescription = cleanup(description); System.out.println("DESCRIPTION = " + mRoad.mDescription); } catch (Exception ex) { ex.printStackTrace(); } return mRoad; } static double[][] addDouble(double[][] array, double[] element) { int arrayLength = array.length; double[][] result = new double[arrayLength + 1][]; for (int i = 0; i < arrayLength; i++) { int elementLength = array[i].length; result[i] = new double[elementLength]; for (int j = 0; j < elementLength; j++) result[i][j] = array[i][j]; } int newElementLength = element.length; result[arrayLength] = new double[newElementLength]; for (int j = 0; j < newElementLength; j++) result[arrayLength][j] = element[j]; return result; } static double[] addDouble(double[] array, double element) { int arrayLength = array.length; double[] result = new double[arrayLength + 1]; for (int i = 0; i < arrayLength; i++) result[i] = array[i]; result[arrayLength] = element; return result; } public static String getUrl(double fromLat, double fromLon, double toLat, double toLon) { StringBuffer urlString = new StringBuffer(); urlString.append("http://maps.google.com/maps?f=d&amp;hl=en"); urlString.append("&amp;saddr="); urlString.append(Double.toString(fromLat)); urlString.append(","); urlString.append(Double.toString(fromLon)); urlString.append("&amp;daddr="); urlString.append(Double.toString(toLat)); urlString.append(","); urlString.append(Double.toString(toLon)); urlString.append("&amp;ie=UTF8&amp;0&amp;om=0&amp;output=kml"); return urlString.toString(); } private static String cleanup(String value) { String remove = "<br/>"; int index = value.indexOf(remove); if (index != -1) value = value.substring(0, index); remove = "&amp;#160;"; index = value.indexOf(remove); int len = remove.length(); while (index != -1) { value = value.substring(0, index).concat(value.substring(index + len, value.length())); index = value.indexOf(remove); } return value; } }


How to set View width (height) in percentage of parent View in Android


How to set View width (height) in percentage of parent View in Android


Example:
I want to set child LinearLayout height = 50% of parrent LinearLayout in Android. Like in HTML.
To set height in percents I do some trick with android:layout_weight and android:weightSum
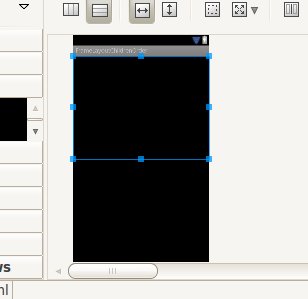
Here the screenshot:
Android Layout height equals 50 percents of parrent


To do this you need do somethind like this. Look at code below:


<?xml version="1.0" encoding="utf-8"?>
<LinearLayout xmlns:android="http://schemas.android.com/apk/res/android"
 android:orientation="vertical"
 android:layout_width="match_parent"
 android:layout_height="match_parent"
 android:weightSum="100">
 <LinearLayout android:layout_weight="50"
  android:layout_width="match_parent"
  android:id="@+id/linearLayout1"
  android:layout_height="wrap_content"
  android:orientation="vertical"></LinearLayout>
</LinearLayout>